


Nissan Frontier: Child restraints
- Precautions on child restraints
- LATCH (Lower Anchors and Tethers for CHildren) system
- Rear-facing child restraint installation using LATCH (Crew Cab models)
- Rear-facing child restraint installation using LATCH - jump seat (King Cab models)
- Rear-facing child restraint installation using the seat belts (Crew Cab models)
- Rear-facing child restraint installation using the seat belts - jump seat (King Cab models)
- Forward-facing child restraint installation using LATCH (Crew Cab models)
- Forward-facing child restraint installation using LATCH - jump seat (King Cab models)
- Forward-facing child restraint installation using the seat belts - front passenger and rear bench seat (Crew Cab models)
- Forward-facing child restraint installation using the seat belts - front passenger and jump seats (King Cab models)
- Booster seats
Precautions on child restraints
WARNING
- Failure to properly install and use a child restraint system in the Nissan
Frontier can result in serious injury or death during sudden braking or a collision.
Always strictly follow all safety instructions and manufacturer guidelines.
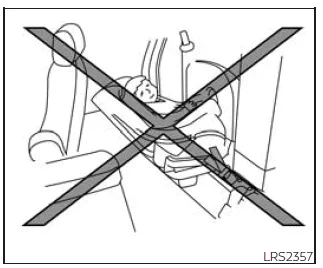
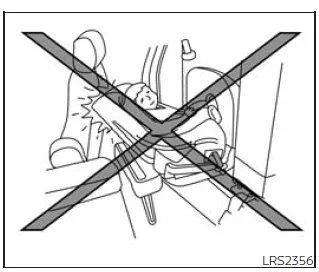
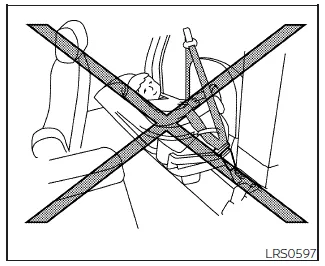
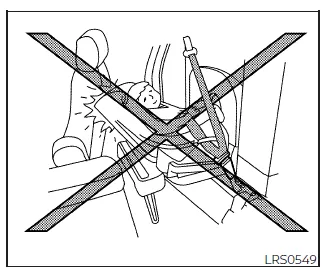
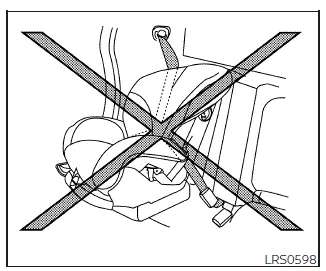
- Never install a rear-facing child restraint in the driver's side rear seating position of the Nissan Frontier.
- Do not install forward-facing child seats or booster seats if the base extends beyond the front edge of the seat cushion, as this may compromise stability and safety.
- Always install and use the child restraint exactly as instructed by the manufacturer. Improper installation in the Nissan Frontier can significantly reduce effectiveness.
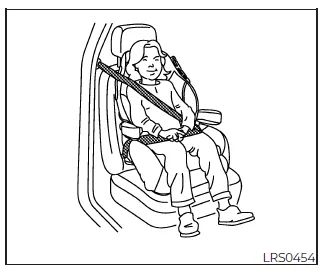
- Never hold a child on your lap while the Nissan Frontier is in motion. In the event of a collision, even a strong adult cannot restrain a child safely.
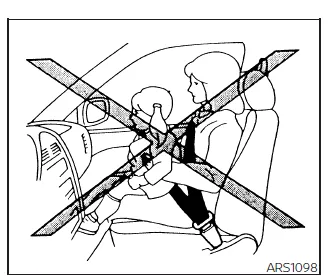
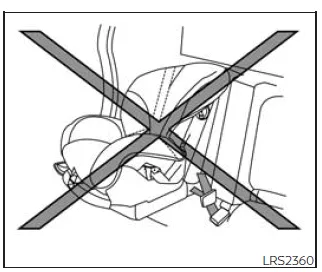
- Never use a single seat belt for more than one occupant. Each child must have their own properly installed restraint system.
- NISSAN strongly recommends installing all child restraints in the rear seats of the Nissan Frontier. Studies confirm that rear seating positions offer greater protection for children.
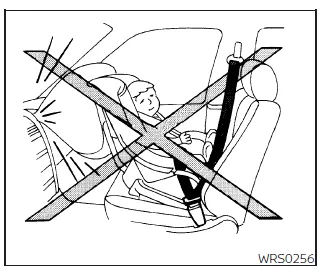
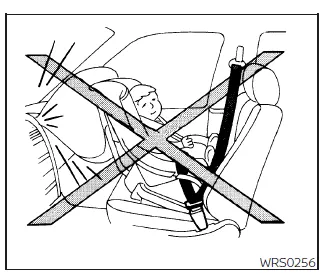
- Even with the advanced airbag system in the Nissan Frontier, never place a rear-facing child restraint in the front passenger seat. Deployment of the airbag can cause severe injury or death.
- Always select a child restraint that is compatible with both your child’s size and the Nissan Frontier seating configuration.
- Child restraint anchor points in the Nissan Frontier are designed
exclusively for properly installed child restraints. They must never be
used for securing adult seat belts, cargo, or any other equipment.
Misuse of anchor points can damage the anchorage system and compromise the safety of the child restraint, potentially leading to serious injury in an accident.
- Never use child restraint anchor points for purposes other than securing child restraints.
- Child restraints with top tether straps should not be installed in the front passenger seat in Nissan Frontier King Cab models.
- After installing a child restraint, ensure that the seatback remains as upright as possible for maximum stability and safety.
- Infants and children must always be secured in an appropriate child restraint system when traveling in the Nissan Frontier.
- When a child restraint is not in use, it must still be secured using the LATCH system or a seat belt. In the Nissan Frontier, unsecured objects can become dangerous during sudden stops or collisions.
CAUTION
A child restraint left inside a closed Nissan Frontier can become extremely hot. Always check the seating surface and buckle temperature before placing a child in the seat to prevent burns or discomfort.
This Nissan Frontier is equipped with a universal child restraint anchoring system known as LATCH (Lower Anchors and Tethers for Children). Many modern child restraints are designed with connectors that attach directly to these anchors for secure installation.
If your child restraint is not compatible with the LATCH system, the vehicle’s seat belt system can be used to safely install the child seat in the Nissan Frontier.
Various manufacturers provide child restraint systems suitable for different ages, weights, and sizes. When selecting a child restraint for your Nissan Frontier, consider the following important factors:
- Choose only a child restraint certified to meet Federal Motor Vehicle Safety Standard 213 or Canadian Motor Vehicle Safety Standard 213.
- Test the child restraint in your Nissan Frontier to confirm compatibility with the seat shape and seat belt system.
- Ensure the restraint fits your child properly. Adjust all straps and components according to the manufacturer’s recommendations for height and weight.
- If the combined weight of the child and the restraint is less than 65 lbs (29.5 kg), either the LATCH system or the vehicle seat belt may be used (but never both simultaneously).
- If the combined weight exceeds 65 lbs (29.5 kg), the child restraint must be installed using the vehicle’s seat belt instead of the lower anchors.
- Always follow the detailed installation and usage instructions provided by the child restraint manufacturer when using it in the Nissan Frontier.
All U.S. states and Canadian provinces or territories legally require that infants and small children be secured in an approved child restraint system whenever the vehicle is in motion. Canadian regulations also require that forward-facing child restraints use a top tether strap connected to the designated anchor point in the Nissan Frontier.
LATCH (Lower Anchors and Tethers for CHildren) system
Basic Information
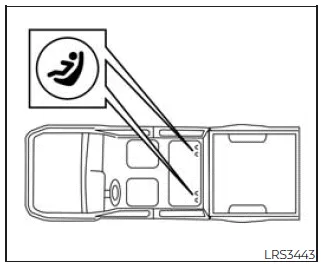
LATCH system lower anchor locations (Crew Cab models)
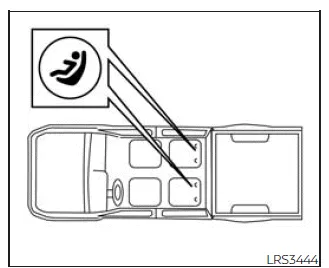
LATCH system lower anchor locations (King Cab models)
Your Nissan Frontier is equipped with dedicated anchor points designed specifically for use with LATCH-compatible child restraint systems. This system, also commonly known as ISOFIX, allows secure installation of child seats without relying on the standard vehicle seat belts.
In the Nissan Frontier, the LATCH system simplifies installation and improves consistency when securing child restraints. However, if the combined weight of the child and the restraint exceeds 65 lbs (29.5 kg), the vehicle’s seat belt must be used instead of the lower anchors.
Always carefully follow both the Nissan Frontier manual and the child restraint manufacturer’s instructions to ensure proper installation and maximum safety.
The LATCH lower anchor points in the Nissan Frontier are located only in the rear outboard seating positions. Never attempt to install a child restraint in the center rear seat using LATCH anchors, as this will not provide proper support or safety.
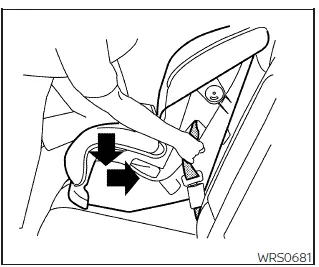
LATCH lower anchor
WARNING
Improper use or incorrect installation of child restraints in the Nissan Frontier may result in severe injury or death in the event of a sudden stop or collision.
- Attach LATCH-compatible child restraints only to the designated anchor points shown in the Nissan Frontier diagrams.
- Do not attempt to secure a child restraint in the center rear seating position using LATCH anchors, as proper installation cannot be achieved.
- Before installation, check the anchor area by inserting your fingers to ensure there are no obstructions such as seat belt webbing or seat cushion material. Obstructed anchors may prevent correct installation in the Nissan Frontier.
Child restraint anchor points in the Nissan Frontier are engineered exclusively to handle forces generated by properly installed child seats.
They must never be used to secure adult seat belts, cargo, or other equipment. Misuse can damage the anchors, leading to improper restraint installation and increasing the risk of serious injury or death during a collision.
LATCH lower anchor location
LATCH locations (King Cab models)
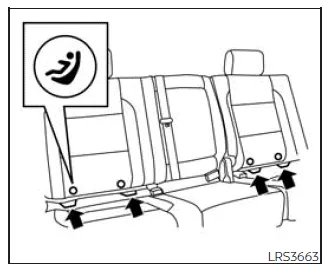
LATCH locations (Crew Cab models)
LATCH locations (Crew Cab models)
The LATCH anchors in the Nissan Frontier are positioned as illustrated above. Labels on the seatback help you quickly identify the anchor locations for safe and correct installation.
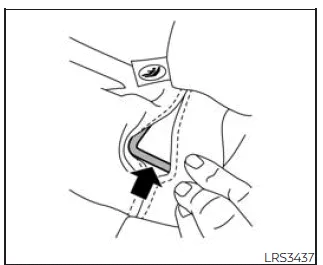
Installing child restraint LATCH lower anchor attachments
LATCH webbing-mounted attachment
LATCH rigid-mounted attachment
LATCH-compatible child restraints designed for the Nissan Frontier include either rigid connectors or flexible webbing attachments. These connect directly to the anchor points for a secure fit.
Before installation, confirm that your child restraint is labeled as LATCH-compatible. This information can be found on the product label or in the manufacturer’s instructions.
When installing a child seat in the Nissan Frontier, always follow both the vehicle manual and the child restraint manufacturer’s instructions carefully to ensure maximum protection.
Top tether anchor
WARNING
- Do not allow cargo to interfere with the top tether strap when it is connected in the Nissan Frontier. Always secure cargo properly to prevent contact with the tether strap, as damage may compromise child safety in a collision.
- Top tether and LATCH anchor points in the Nissan Frontier are designed
solely for child restraint systems.
They must never be used for adult seat belts, harnesses, or securing cargo.
Improper use may damage the anchorage system, resulting in incorrect installation and increased risk of injury or death during an accident.
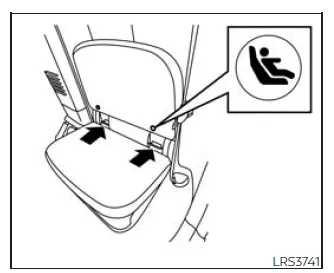
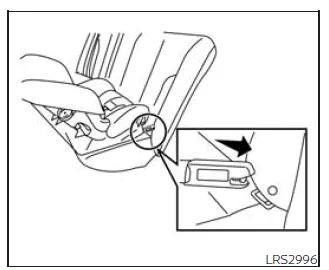
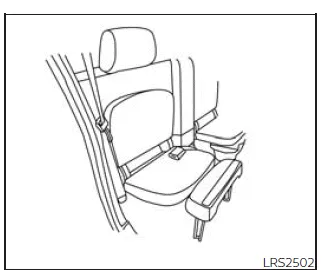
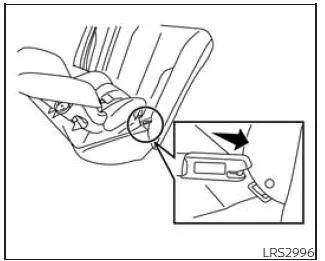
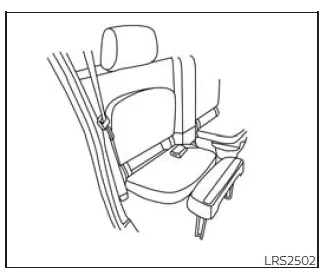
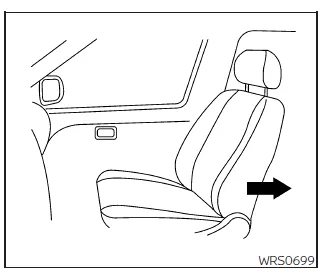
Rear bench seat (Crew Cab models)
Top tether anchor point locations
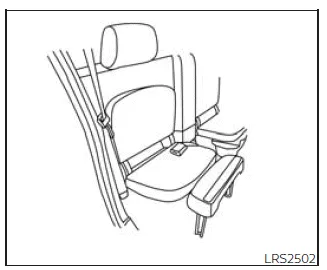
In Nissan Frontier Crew Cab models, the top tether anchor points are located behind the rear bench seat, beneath the rear window, as shown in the illustration.
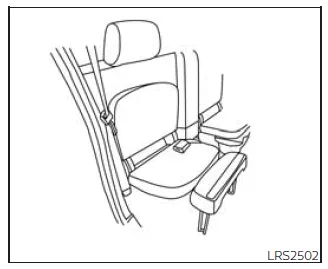
Jump seats (King Cab models - passenger side shown)
- Cover plate
- Routing bracket
- Anchor point
- In Nissan Frontier King Cab models, the anchor point is located on the floor between the jump seat belt buckles in the center of the vehicle.
The anchor point is positioned on the floor between the jump seat belt buckles, while the routing bracket is located behind the cover plate beneath the rear window above the jump seat. Always ensure proper routing of the tether strap when installing a child restraint in the Nissan Frontier.
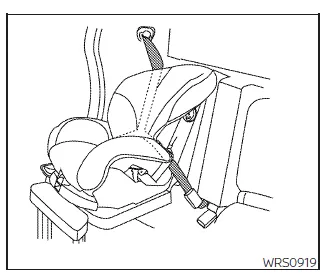
Rear-facing child restraint installation using LATCH (Crew Cab models)
In the Nissan Frontier, the LATCH system provides a secure and convenient way to install rear-facing child restraints. However, the lower anchors must not be used if the combined weight of the child and the child restraint exceeds 65 lbs. (29.5 kg). In such cases, the vehicle’s seat belt must be used instead to properly secure the child restraint.
Always follow both the Nissan Frontier owner’s manual and the child restraint manufacturer’s instructions carefully to ensure correct installation and maximum safety for your child.
Follow these steps to properly install a rear-facing child restraint in the rear seats of the Nissan Frontier using the LATCH system:
1. Carefully position the child restraint on the rear seat of the Nissan Frontier, ensuring it is aligned properly with the seating surface.
Always follow the child restraint manufacturer’s instructions for correct positioning and orientation.
Rear-facing webbing-mounted - step 2
Rear-facing rigid-mounted - step 2
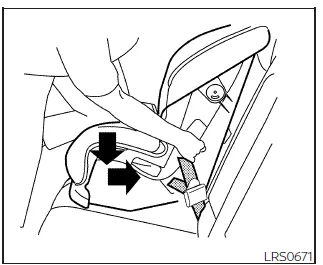
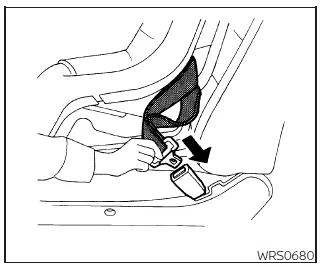
2. Attach the child restraint connectors to the LATCH lower anchors in the Nissan Frontier.
Ensure that each attachment clicks securely into place and that the connectors are properly aligned with the anchor points.

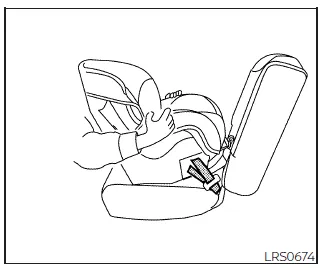
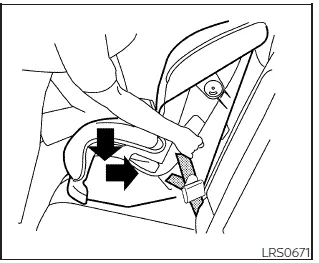
Rear-facing - step 3
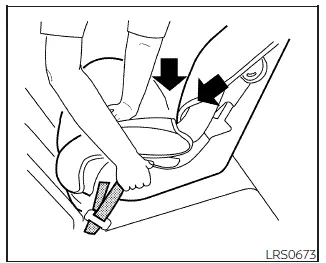
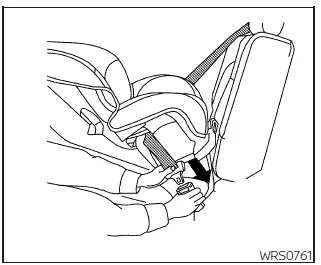
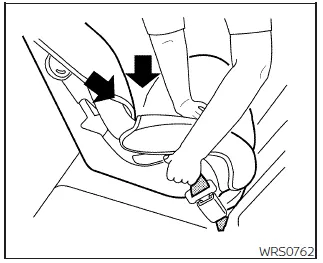
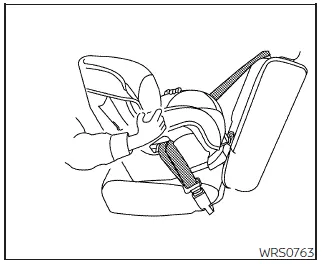
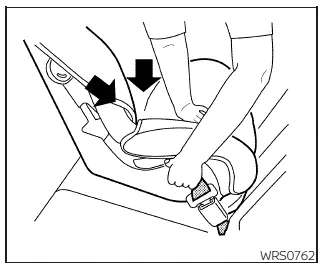
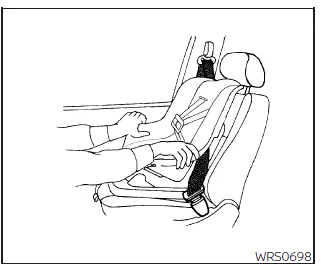
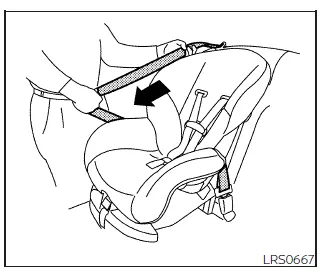
3. For child restraints equipped with webbing-mounted attachments, remove all slack from the straps. Firmly press down and back on the child restraint using your hand to compress the Nissan Frontier seat cushion and seatback while tightening the straps. This ensures a tight and secure fit.
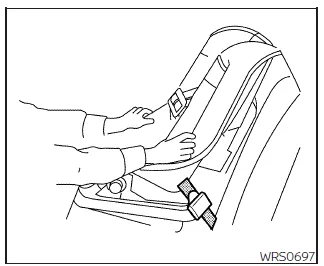
Rear-facing - step 4
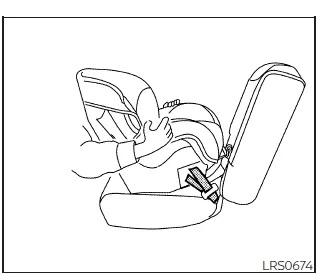
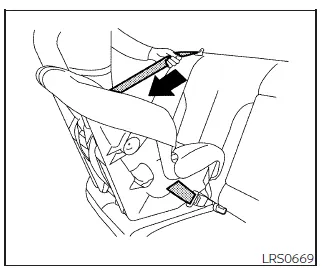
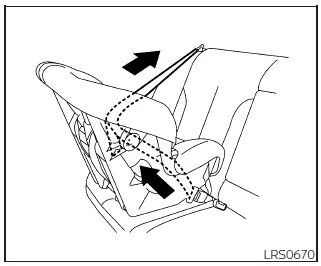
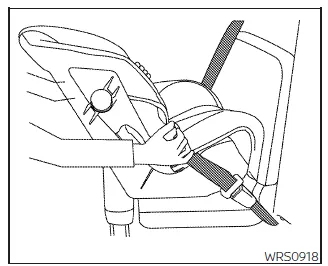
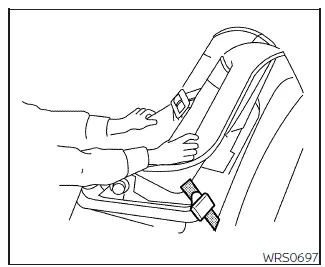
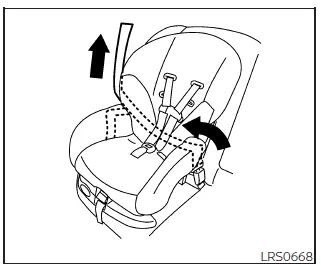
4. After installation, always test the child restraint before placing your child inside. Hold the restraint near the LATCH attachment path and attempt to move it side to side. In the Nissan Frontier, the seat should not move more than 1 inch (25 mm).
Additionally, pull the restraint forward to verify that it remains securely anchored. If there is excessive movement, tighten the attachments further or reposition the child restraint.
If the child restraint cannot be properly secured, try a different seating position in the Nissan Frontier or install it using the vehicle’s seat belt instead. Not all child restraints are compatible with every vehicle seat design.
5. Before every trip, check that the child restraint in your Nissan Frontier is securely installed. If any looseness is detected, repeat steps 2 through 4 to ensure proper safety.
For added safety, periodically recheck the installation, especially after long trips or if the seat has been adjusted. Proper installation in the Nissan Frontier is critical for protecting your child in all driving conditions.
Rear-facing child restraint installation using LATCH - jump seat (King Cab models)
WARNING
- If a child restraint system is not correctly installed in the Nissan
Frontier, it may fail to provide proper protection, resulting in serious injury
or death during a sudden stop or collision.
- Never install a rear-facing child restraint on the driver's side jump seat in the Nissan Frontier.
- Do not install a child restraint on the passenger-side jump seat unless the seat extension is fully unfolded and properly secured.
WARNING
- To safely install a rear-facing child restraint on the passenger-side
jump seat in the Nissan Frontier, the front passenger seat must be moved completely
forward and the seatback placed in an upright or forward-tilted position.
- The front passenger seat must not be used while a rear-facing child restraint is installed behind it on the jump seat. Failure to follow this precaution may result in serious injury during a sudden stop or collision.
Do not use the lower LATCH anchors in the Nissan Frontier if the combined weight of the child and the child restraint exceeds 65 lbs (29.5 kg). In such cases, the vehicle’s seat belt must be used instead of the lower anchors.
Always follow both the Nissan Frontier owner’s manual and the child restraint manufacturer’s installation instructions to ensure safe and correct usage.
Follow these steps to install a rear-facing child restraint on the jump seat in the Nissan Frontier:
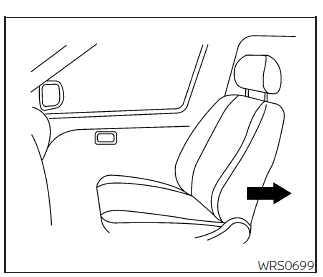
Full open seating position
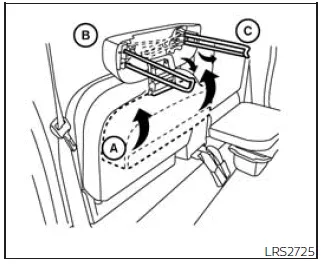
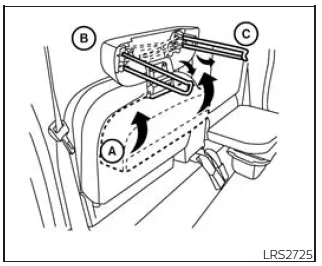
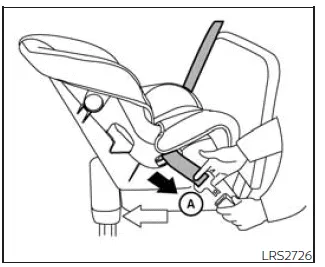
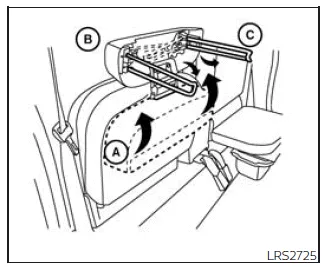
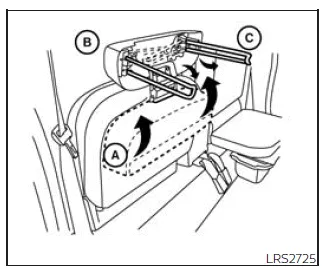
1. To access the jump seat extension (passenger side only) A, pull upward B to unfold the extension. Then deploy the support legs C and lower the jump seat until it reaches the fully open seating position in the Nissan Frontier.
Rear-facing - step 2
2. Move the front passenger seat fully forward and adjust the seatback to an upright or forward-tilted position. Place the child restraint on the jump seat. The orientation of the restraint will depend on its type and the size of the child. Always follow the manufacturer’s instructions when installing the child restraint in the Nissan Frontier.
3. Carefully position the child restraint on the seat, ensuring it sits flat and stable.
Always follow the child restraint manufacturer’s guidelines for correct placement and alignment.
Rear-facing webbing-mounted - step 4
Rear-facing rigid-mounted - step 4
4. Attach the child restraint connectors to the LATCH lower anchors in the Nissan Frontier. Ensure each connector is properly secured and locked into place.
Check the attachment points carefully to confirm that the connectors are fully engaged with the anchors.
Rear-facing - step 5
5. For restraints with webbing-mounted attachments, remove any slack from the straps. Press firmly downward and rearward in the center of the child restraint to compress the seat cushion and seatback of the Nissan Frontier while tightening the straps to achieve a secure fit.
Rear-facing - step 6
6. After installation, always test the stability of the child restraint before placing your child inside. Hold the restraint near the LATCH attachment path and attempt to move it side to side. In the Nissan Frontier, the movement should not exceed 1 inch (25 mm).
Also pull the restraint forward to ensure it remains firmly secured. If excessive movement is detected, tighten the attachments or reposition the seat.
If the restraint cannot be securely installed, consider using a different seating position or installing it with the vehicle’s seat belt. Not all child restraints are compatible with every seat configuration in the Nissan Frontier.
7. Before each use, verify that the child restraint is securely installed. If any looseness is detected, repeat steps 1 through 6 to ensure maximum safety in the Nissan Frontier.
For optimal protection, periodically recheck the installation, especially after adjusting seats or after long trips. Proper installation is essential to ensure the safety of children in the Nissan Frontier under all driving conditions.
Rear-facing child restraint installation using the seat belts (Crew Cab models)
WARNING
When installing a child restraint in the Nissan Frontier using the vehicle seat belt, the three-point seat belt must be switched into Automatic Locking Retractor (ALR) mode. This mode is specifically designed to securely hold child restraints in place.
If ALR mode is not properly engaged, the child restraint in the Nissan Frontier may remain loose or unstable, increasing the risk of tipping or movement. This can lead to serious injury or even death in the event of a sudden stop or collision. Improper installation may also affect the operation of the front passenger air bag system.
Do not use the LATCH lower anchors in the Nissan Frontier if the combined weight of the child and the child restraint exceeds 65 lbs (29.5 kg). In such cases, always use the vehicle’s seat belt for installation.
Always follow both the Nissan Frontier manual and the child restraint manufacturer’s instructions carefully to ensure proper installation and maximum safety.
Follow these steps to correctly install a rear-facing child restraint in the rear seats of the Nissan Frontier using the seat belt system:
Rear-facing - step 1
1. Rear-facing child restraints must always be installed in the rear seating area of the Nissan Frontier and must never be used in the front passenger seat. Position the child restraint securely on the seat, ensuring it is aligned correctly.
Always follow the child restraint manufacturer’s instructions regarding placement and orientation.
Rear-facing - step 2
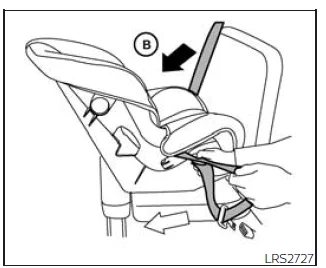
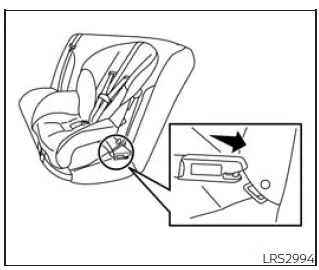
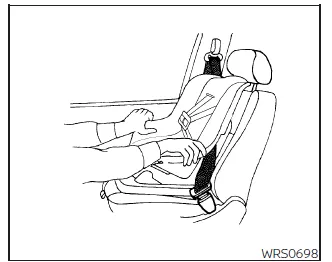
2. Route the seat belt through the designated path in the child restraint, then insert the latch plate into the buckle until you hear a click indicating it is securely fastened.
Make sure the belt routing matches the instructions provided by the child restraint manufacturer for proper installation in the Nissan Frontier.
Rear-facing - step 3
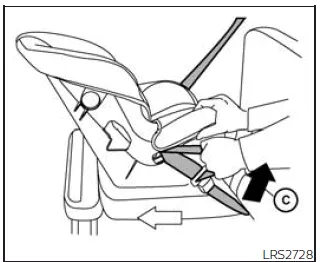
3. Pull the shoulder belt completely out of the retractor. This action activates the ALR mode (child restraint mode) in the Nissan Frontier. The system will automatically switch back to ELR mode once the belt is fully retracted.
Rear-facing - step 4
4. Allow the seat belt to retract slowly while pulling upward on the shoulder portion to remove slack. This ensures the belt tightens securely around the child restraint.
Rear-facing - step 5
5. Remove any remaining slack by pressing firmly downward and rearward in the center of the child restraint. This compresses the Nissan Frontier seat cushion and seatback while tightening the seat belt for a secure installation.
Rear-facing - step 6
6. After installation, always test the stability of the child restraint before placing your child inside. Hold the restraint near the seat belt path and attempt to move it side to side. In the Nissan Frontier, movement should not exceed 1 inch (25 mm).
Pull the restraint forward as well to ensure it remains firmly secured. If excessive movement is detected, tighten the belt further or reposition the restraint.
If the child restraint cannot be properly secured, try a different seating position or a different restraint model. Not all child restraints fit every seating configuration in the Nissan Frontier.
7. Before each trip, verify that the child restraint is securely installed. If the seat belt is not properly locked, repeat steps 3 through 6 to ensure correct installation.
After removing the child restraint and allowing the seat belt to fully retract, the ALR mode (child restraint mode) in the Nissan Frontier will automatically disengage and return to normal operation.
For added safety, it is recommended to periodically recheck the installation, especially after long trips or adjustments to the seating position. Proper installation in the Nissan Frontier is essential to ensure maximum protection for your child in all driving conditions.
Rear-facing child restraint installation using the seat belts - jump seat (King Cab models)
WARNING
- When installing a rear-facing child restraint in the Nissan Frontier
using the vehicle seat belt, the three-point seat belt must be switched into
Automatic Locking Retractor (ALR) mode. This mode ensures the child restraint
is securely held in place.
Failure to activate ALR mode may result in an improperly secured child restraint, which could tip or move during a sudden stop or collision, increasing the risk of serious injury. Incorrect installation may also affect the operation of the front passenger air bag system in the Nissan Frontier.
- If a child restraint system is not properly installed in the Nissan Frontier,
it may not provide adequate protection, potentially leading to severe injury
or death in the event of an accident.
- Never install a rear-facing child restraint on the driver's side jump seat.
- Do not install a child restraint on the passenger-side jump seat unless the seat extension is fully unfolded and properly locked into position.
WARNING
- To safely install a rear-facing child restraint on the passenger-side
jump seat in the Nissan Frontier, the front passenger seat must be moved fully
forward, and the seatback must be positioned upright or tilted forward.
- The front passenger seat must not be used while a rear-facing child restraint is installed behind it. Ignoring this precaution may result in serious injury during sudden braking or a collision.
Do not use the lower anchors in the Nissan Frontier if the combined weight of the child and the child restraint exceeds 65 lbs (29.5 kg). In such cases, always use the vehicle’s seat belt to secure the child restraint.
Always follow both the Nissan Frontier owner’s manual and the child restraint manufacturer’s instructions carefully to ensure proper installation and maximum safety.
Follow these steps to install a rear-facing child restraint on the passenger-side jump seat in the Nissan Frontier:
Full open seating position
1. To access the jump seat extension A on the passenger side, pull upward B to unfold the extension. Then deploy the support legs C and lower the jump seat until it reaches the fully open seating position in the Nissan Frontier.

Rear-facing - step 2
2. Move the front passenger seat completely forward and adjust the seatback to an upright or forward-tilted position. Carefully place the rear-facing child restraint onto the jump seat, ensuring proper alignment.
Always follow the child restraint manufacturer’s instructions regarding positioning and seat belt routing when installing in the Nissan Frontier.
3. Route the seat belt through the designated path in the child restraint and insert the latch plate into the buckle until it clicks securely into place.
4. Pull the shoulder belt fully out to activate ALR mode, then allow the belt to retract while removing all slack. Press firmly downward and rearward on the child restraint to compress the Nissan Frontier seat cushion while tightening the belt.
5. After installation, test the stability of the child restraint. Hold it near the belt path and attempt to move it side to side. Movement should not exceed 1 inch (25 mm) in the Nissan Frontier.
6. Pull the restraint forward to confirm it remains securely fixed. If looseness is detected, tighten the belt further or reposition the seat.
7. Before every trip, check that the child restraint is securely installed. If necessary, repeat the installation steps to ensure maximum safety in the Nissan Frontier.
For additional safety, periodically inspect the installation, especially after seat adjustments or extended use. Proper installation in the Nissan Frontier is essential to ensure effective protection for your child under all driving conditions.
2. Move the front passenger seat in the Nissan Frontier fully forward to create sufficient space for safe installation. Then adjust the front seatback to an upright or slightly forward-tilted position. Carefully place the child restraint onto the jump seat. The correct orientation of the child restraint will depend on its design and the size of the child. Always follow the child restraint manufacturer’s instructions to ensure proper positioning and maximum safety in the Nissan Frontier.
Rear-facing - step 3
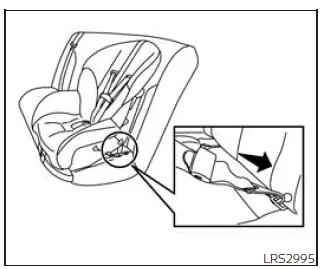
3. Route the seat belt latch plate through the designated belt path of the child restraint and insert it into the buckle until you hear and feel a secure click A. This confirms that the belt is properly engaged.
Ensure that the belt routing follows the exact instructions provided by the child restraint manufacturer, as correct routing is essential for proper installation in the Nissan Frontier.
Rear-facing - step 4
4. Pull the shoulder portion of the seat belt fully outward B until it reaches its maximum extension. At this point, the seat belt retractor in the Nissan Frontier switches to Automatic Locking Retractor (ALR) mode, which is specifically designed for securing child restraints. The system will return to normal ELR mode once the belt is completely retracted.
Rear-facing - step 5
5. Allow the seat belt to retract gradually. While doing so, pull upward on the shoulder belt C to eliminate any slack. This step ensures that the child restraint is held firmly in place within the Nissan Frontier.
Rear-facing - step 6
6. Remove any remaining slack by pressing firmly downward and rearward in the center of the child restraint. This compresses the Nissan Frontier seat cushion and seatback, allowing the belt to tighten securely around the restraint.
Rear-facing - step 7
7. After installation, always test the child restraint before placing your child inside. Hold the restraint near the seat belt path and push it side to side. In the Nissan Frontier, movement should not exceed 1 inch (25 mm).
Also pull the restraint forward to verify that it is securely held in place. If excessive movement is detected, tighten the seat belt further or reposition the restraint.
If the child restraint cannot be properly secured, try a different seating position or a different restraint model. Not all child restraints are compatible with every seating configuration in the Nissan Frontier.
8. Before each trip, confirm that the child restraint is securely installed. If the seat belt is not properly locked, repeat steps 3 through 7 to ensure maximum safety in the Nissan Frontier.
After removing the child restraint and allowing the seat belt to fully retract, the ALR mode (child restraint mode) will automatically disengage and return to standard operation in the Nissan Frontier.
For added safety, it is recommended to periodically recheck the installation, especially after adjusting seats or after extended use. Proper installation in the Nissan Frontier is essential to ensure reliable protection for your child in all driving conditions.
Forward-facing child restraint installation using LATCH (Crew Cab models)
Basic information
In the Nissan Frontier, the LATCH system provides a secure and reliable method for installing forward-facing child restraints in the rear seating positions. However, the lower anchors must not be used if the combined weight of the child and the child restraint exceeds 65 lbs. (29.5 kg). In such cases, the vehicle’s seat belt system must be used instead to ensure proper installation and safety.
Always carefully follow both the Nissan Frontier owner’s manual and the child restraint manufacturer’s instructions to achieve a correct and secure installation.
Follow these steps to install a forward-facing child restraint in the rear seats of the Nissan Frontier using the LATCH system:
1. Position the child restraint securely on the rear seat of the Nissan Frontier, ensuring that it sits flat against the seat surface.
Always follow the child restraint manufacturer’s recommendations regarding positioning and orientation.
Forward-facing webbing-mounted - step 2
Forward-facing rigid-mounted - step 2
2. Attach the child restraint connectors to the LATCH lower anchors in the Nissan Frontier. Ensure that each connector is firmly secured and properly engaged.
Check the connection points carefully to confirm that the attachments are fully locked into place.
If the child restraint is equipped with a top tether strap, route it correctly and attach it to the designated tether anchor point in the Nissan Frontier.
Do not install a child restraint that requires a top tether strap in a seating position that is not equipped with a tether anchor.
3. The back of the child restraint should rest firmly against the vehicle seatback. This ensures stability and proper positioning in the Nissan Frontier.
If necessary, adjust or temporarily remove the head restraint/headrest to achieve a proper fit. If removed, store it securely and reinstall it once the child restraint is no longer in use.
If the seating position does not have an adjustable head restraint or if it interferes with installation, consider using a different seating position or selecting a compatible child restraint for the Nissan Frontier.
Forward-facing - step 4
4. For restraints with webbing-mounted attachments, remove any slack from the straps. Press firmly downward and rearward in the center of the child restraint—using your knee if necessary—to compress the Nissan Frontier seat cushion and seatback while tightening the straps for a secure fit.
5. Tighten the top tether strap according to the manufacturer’s instructions to eliminate any remaining slack and improve stability in the Nissan Frontier.
Forward-facing - step 6
6. After installation, always test the child restraint before placing your child inside. Hold the restraint near the LATCH attachment path and attempt to move it side to side. In the Nissan Frontier, movement should not exceed 1 inch (25 mm).
Also pull the restraint forward to verify that it is securely anchored. If excessive movement is detected, tighten the attachments further or reposition the seat.
If the restraint cannot be properly secured, try another seating position or a different child restraint model. Not all restraints are compatible with every seating configuration in the Nissan Frontier.
7. Before every trip, confirm that the child restraint is securely installed. If any looseness is detected, repeat steps 3 through 6 to ensure maximum safety in the Nissan Frontier.
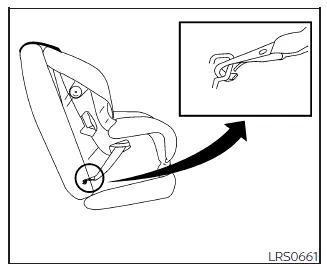
Anchor point access
- Pull strap
- Anchor points
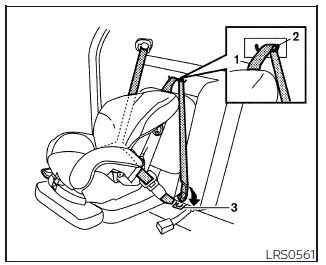
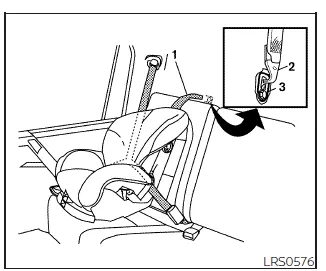
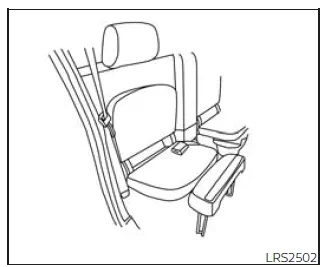
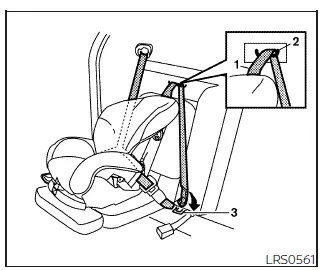
Installing top tether strap (rear bench seat for Crew Cab models)
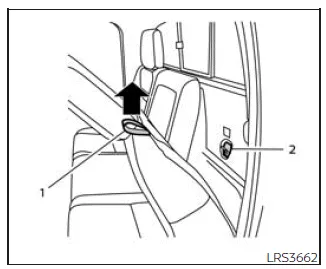
To access the tether anchor points behind the rear bench seat in the Nissan Frontier, tilt the seatback forward by pulling the strap located behind it.

Rear bench seat (Crew Cab models)
- Top tether strap
- Tether strap
- Tether anchor point
Before securing the child restraint with the LATCH lower anchors in the Nissan Frontier, follow these steps:
1. If necessary, raise or remove the head restraint/headrest to correctly position the top tether strap. Store the head restraint securely and reinstall it when the child restraint is removed.
2. Route the top tether strap as shown to ensure proper alignment.
3. Attach the tether strap securely to the tether anchor point.
4. Return the seatback to its locked position.
5. Refer back to the installation steps and tighten the tether strap fully to ensure maximum stability.
If you have any questions or require assistance when installing a top tether strap in your Nissan Frontier, it is recommended to consult an authorized NISSAN dealer for professional support.
Forward-facing child restraint installation using LATCH - jump seat (King Cab models)
Basic information
WARNING
- If a child restraint system is not properly installed in the Nissan Frontier,
it may not provide adequate protection, increasing the risk of serious injury
or death during a sudden stop or collision.
- Do not install a child restraint on the passenger-side jump seat unless the seat extension is fully unfolded and securely positioned.
- For forward-facing child restraints and booster seats, do not install the restraint if its base extends beyond the front edge of the driver-side seat cushion, as this may compromise stability and safety in the Nissan Frontier.
Do not use the LATCH lower anchors in the Nissan Frontier if the combined weight of the child and the child restraint exceeds 65 lbs (29.5 kg). In such cases, use the vehicle’s seat belt system instead to ensure proper installation.
Always follow both the Nissan Frontier owner’s manual and the child restraint manufacturer’s instructions carefully to achieve a safe and secure installation.
Follow these steps to install a forward-facing child restraint on the jump seat in the Nissan Frontier:
Full open seating position
1. To access the passenger-side jump seat extension A, pull upward B to unfold the extension. Then deploy the support legs C and lower the seat into the fully open seating position in the Nissan Frontier.
2. Position the child restraint on the jump seat, ensuring it sits flat and stable against the seat surface.
Always follow the child restraint manufacturer’s instructions regarding positioning and orientation.
Forward-facing webbing-mounted - step 3
Forward-facing rigid-mounted - step 3
3. Attach the child restraint connectors to the LATCH lower anchors in the Nissan Frontier. Ensure that the connectors are securely locked into place and properly aligned with the anchor points.
Check each connection carefully to confirm proper engagement.
If the child restraint includes a top tether strap, route it correctly and attach it to the designated tether anchor point.
Do not install child restraints that require a top tether strap in seating positions without a tether anchor in the Nissan Frontier.
4. The back of the child restraint should rest firmly against the vehicle seatback to ensure stability.
If necessary, adjust or remove the head restraint/headrest to achieve proper fit. Store the removed head restraint securely and reinstall it once the child restraint is removed.
If the head restraint cannot be adjusted and interferes with proper installation, use a different seating position or select a compatible child restraint for the Nissan Frontier.
Forward-facing - step 5
5. For child restraints with webbing-mounted attachments, remove all slack from the straps. Press firmly downward and rearward in the center of the child restraint—using your knee if necessary—to compress the Nissan Frontier seat cushion and seatback while tightening the straps.
6. Tighten the top tether strap according to the manufacturer’s instructions to eliminate any remaining slack and enhance stability.
Forward-facing - step 7
7. After installation, always test the child restraint before placing your child inside. Hold the restraint near the LATCH attachment path and attempt to move it side to side. In the Nissan Frontier, the restraint should not move more than 1 inch (25 mm).
Pull the restraint forward as well to ensure it remains securely anchored. If excessive movement is detected, tighten the attachments or reposition the seat.
If the restraint cannot be properly secured, try a different seating position or a different child restraint model. Not all restraints fit every configuration in the Nissan Frontier.
8. Before each trip, verify that the child restraint is securely installed. If any looseness is detected, repeat steps 1 through 7 to ensure maximum safety.
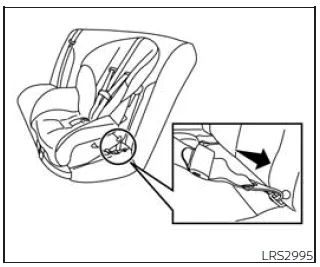
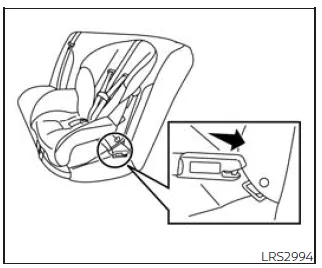
Jump seat (King Cab models)
- Top tether strap
- Routing bracket
- Tether anchor point
Installing top tether strap - jump seat (King Cab models)
WARNING
- Do not attach the top tether strap to the routing bracket in the Nissan Frontier. The strap must be secured only to the designated tether anchor point. Incorrect attachment can significantly increase the risk of injury in a collision.
- Child restraint anchor points in the Nissan Frontier are designed exclusively
for properly installed child restraints.
They must never be used for securing adult seat belts, cargo, or other equipment. Misuse may damage the anchorage system and compromise safety.
The top tether strap must always be used when installing a forward-facing child restraint with LATCH lower anchors in the Nissan Frontier.
First, secure the child restraint using the LATCH lower anchors in the rear seating position.
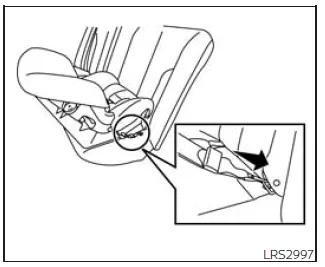
1. Remove the cover plate to access the top tether strap routing bracket for the jump seat.
2. Route the top tether strap through the routing bracket as illustrated.
3. Attach the tether strap securely to the designated tether anchor point.
4. Refer back to the installation steps and tighten the tether strap fully to ensure maximum stability.
If you have any questions regarding top tether strap installation in your Nissan Frontier, it is recommended to consult an authorized NISSAN dealer for professional assistance.
Forward-facing child restraint installation using the seat belts - front passenger and rear bench seat (Crew Cab models)
Basic information
WARNING
When installing a forward-facing child restraint in the Nissan Frontier using the vehicle seat belt, the three-point seat belt must be switched into Automatic Locking Retractor (ALR) mode. This mode ensures that the child restraint is securely held in place and prevents movement during driving.
If ALR mode is not properly engaged, the child restraint may become loose or unstable. This can result in serious injury or death during a sudden stop or collision. Incorrect installation may also interfere with the proper operation of the front passenger air bag system in the Nissan Frontier.
Forward-facing (front passenger seat) - step 1
Do not use the LATCH lower anchors in the Nissan Frontier if the combined weight of the child and the child restraint exceeds 65 lbs (29.5 kg). In such cases, the vehicle’s seat belt must be used instead to ensure a secure installation.
Always follow both the Nissan Frontier owner’s manual and the child restraint manufacturer’s instructions carefully for proper installation.
Follow these steps to install a forward-facing child restraint using the seat belt system in the rear seats or, if necessary, in the front passenger seat of the Nissan Frontier:
1. If installation in the front passenger seat is unavoidable, the child restraint must be forward-facing only. Move the front passenger seat to its rearmost position to maximize distance from the air bag.
Rear-facing child restraints must never be installed in the front seat of the Nissan Frontier.
2. Place the child restraint on the seat, ensuring it is properly aligned and positioned.
Always follow the child restraint manufacturer’s instructions regarding placement and orientation.
The back of the child restraint should be firmly supported against the seatback of the Nissan Frontier.
If necessary, adjust or remove the head restraint/headrest to achieve a proper fit. Store any removed components securely and reinstall them when the child restraint is no longer in use.
If the head restraint interferes with correct installation and cannot be adjusted, use a different seating position or a compatible child restraint designed for the Nissan Frontier.
Forward-facing - step 3
3. Route the seat belt through the designated path in the child restraint and insert the latch plate into the buckle until it clicks securely into place.
Ensure proper belt routing according to the child restraint manufacturer’s instructions for safe installation in the Nissan Frontier.
If the child restraint is equipped with a top tether strap, route it correctly and attach it to the tether anchor point (rear seat installation only).
Do not install a child restraint that requires a top tether strap in a seating position without a tether anchor in the Nissan Frontier.
Forward-facing - step 4
4. Pull the shoulder belt completely outward until it reaches full extension. This activates ALR mode (child restraint mode) in the Nissan Frontier. The system will return to normal ELR mode once the belt is fully retracted.
Forward-facing - step 5
5. Allow the seat belt to retract slowly while pulling upward on the shoulder portion to remove slack and tighten the belt securely around the child restraint.
Forward-facing - step 6
6. Remove any remaining slack by pressing firmly downward and rearward in the center of the child restraint using your knee. This compresses the Nissan Frontier seat cushion and ensures a tight, secure installation.
7. Tighten the top tether strap according to the manufacturer’s instructions to eliminate any remaining slack and improve stability.
Forward-facing - step 8
8. After installation, test the child restraint before placing your child inside. Hold it near the seat belt path and push side to side. In the Nissan Frontier, movement should not exceed 1 inch (25 mm).
Also pull the restraint forward to confirm it is securely held in place. If excessive movement is detected, tighten the seat belt or reposition the restraint.
If necessary, try a different seating position or a different child restraint model. Not all restraints are compatible with every seating configuration in the Nissan Frontier.
9. Before every trip, confirm that the child restraint is properly secured. If the seat belt is not locked, repeat steps 3 through 8.
Forward-facing - step 10
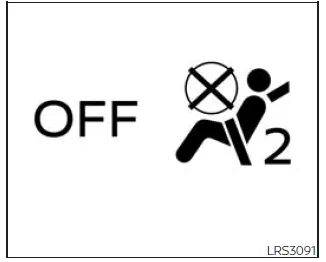
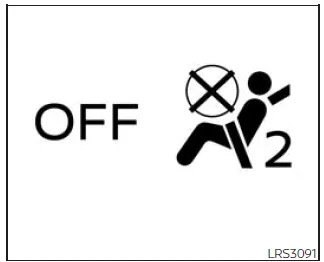
10. If the child restraint is installed in the front passenger seat, turn the
ignition switch to the ON position. Verify that the front passenger air bag status
light
 is illuminated. If the light does not illuminate, refer to the appropriate section
and move the child restraint to another seating position.
is illuminated. If the light does not illuminate, refer to the appropriate section
and move the child restraint to another seating position.
Have the system inspected if necessary. It is recommended to consult an authorized NISSAN dealer to ensure proper operation.
After the child restraint is removed and the seat belt is fully retracted, ALR mode (child restraint mode) in the Nissan Frontier will automatically disengage.
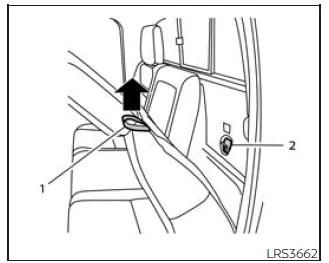
Anchor point access
- Pull strap
- Anchor points
Installing top tether strap (rear bench seat for Crew Cab models)
To access the tether anchor points behind the rear bench seat in the Nissan Frontier, tilt the seatback forward by pulling the strap located behind it.
Rear bench seat (Crew Cab models)
- Top tether strap
- Tether strap
- Tether anchor point
The top tether strap must always be used when installing a forward-facing child restraint with the seat belt system in the Nissan Frontier.
First, secure the child restraint using the vehicle seat belt.
1. If necessary, raise or remove the head restraint/headrest to properly position the tether strap. Store removed components securely and reinstall them when the child restraint is removed.
2. Route the top tether strap as illustrated.
3. Attach the tether strap securely to the designated anchor point.
4. Return the seatback to the locked position.
5. Refer back to the installation steps and tighten the tether strap fully to ensure maximum stability.
If you have any questions regarding installation in your Nissan Frontier, it is recommended to visit an authorized NISSAN dealer for professional assistance.
Forward-facing child restraint installation using the seat belts - front passenger and jump seats (King Cab models)
Basic information
WARNING
- When installing a forward-facing child restraint in the Nissan Frontier
using the vehicle seat belt, the three-point seat belt must be switched into
Automatic Locking Retractor (ALR) mode. This mode ensures that the child restraint
is securely held in place during driving.
If ALR mode is not properly engaged, the child restraint may become loose or unstable. This can result in serious injury or death during sudden braking or a collision. Improper installation may also interfere with the operation of the front passenger air bag system in the Nissan Frontier.
- If a child restraint is not correctly installed in the Nissan Frontier,
it may not provide adequate protection, increasing the risk of serious injury
or fatal consequences in an accident.
- Do not install a child restraint on the passenger-side jump seat unless the seat extension is fully unfolded and securely locked into position.
- For forward-facing child seats and booster seats, do not install the restraint if its base extends beyond the front edge of the driver-side seat cushion, as this may compromise stability and safety in the Nissan Frontier.
Do not use the LATCH lower anchors in the Nissan Frontier if the combined weight of the child and the child restraint exceeds 65 lbs (29.5 kg). In such cases, the vehicle’s seat belt must be used instead to ensure a secure installation.
Always follow both the Nissan Frontier owner’s manual and the child restraint manufacturer’s instructions carefully to guarantee proper installation and maximum safety.
Follow these steps to install a forward-facing child restraint using the seat belt system in the jump seats (King Cab models) or, if necessary, in the front passenger seat of the Nissan Frontier:
Forward-facing (front passenger seat) - step 1
1. If installation in the front passenger seat is unavoidable, the child restraint must be forward-facing only. Move the seat to the rearmost position to maximize distance from the air bag system in the Nissan Frontier.
Rear-facing child restraints must never be installed in the front passenger seat of the Nissan Frontier.
Forward-facing (jump seat for King Cab models) - step 2
Full open seating position
2. To prepare the passenger-side jump seat in the Nissan Frontier, pull upward on the extension A to unfold it. Then deploy the support legs C and lower the seat into the fully open seating position.
Forward-facing - step 3
3. Place the child restraint on the seat, ensuring it sits flat and stable. The back of the child restraint must rest firmly against the seatback of the Nissan Frontier.
Always follow the child restraint manufacturer’s instructions for correct positioning and orientation.
If necessary, adjust or remove the head restraint/headrest to achieve proper fit. Store any removed components securely and reinstall them after the child restraint is removed.
If the head restraint interferes with proper installation and cannot be adjusted, use a different seating position or a compatible child restraint designed for the Nissan Frontier.
Forward-facing - step 4
4. Route the seat belt through the designated belt path in the child restraint and insert the latch plate into the buckle until it clicks securely into place.
Ensure proper routing according to the child restraint manufacturer’s instructions for safe installation in the Nissan Frontier.
If equipped, route the top tether strap and attach it to the designated tether anchor point.
Do not install child restraints requiring a top tether strap in seating positions without a tether anchor.
Forward-facing - step 5
5. Pull the shoulder belt fully outward until it reaches its maximum length. This activates ALR mode (child restraint mode) in the Nissan Frontier. The system will return to ELR mode once the belt is fully retracted.
Forward-facing - step 6
6. Allow the seat belt to retract while pulling upward on the shoulder portion to remove any slack and ensure a tight fit.
Forward-facing - step 7
7. Remove any remaining slack by pressing firmly downward and rearward in the center of the child restraint using your knee. This compresses the Nissan Frontier seat cushion and ensures the restraint is tightly secured.
8. Tighten the top tether strap according to the manufacturer’s instructions to remove any remaining slack and improve overall stability.
Forward-facing - step 9
9. After installation, always test the child restraint before placing your child inside. Hold the restraint near the seat belt path and attempt to move it side to side. In the Nissan Frontier, movement should not exceed 1 inch (25 mm).
Pull the restraint forward as well to confirm that it is securely anchored. If excessive movement is detected, tighten the belt further or reposition the restraint.
If necessary, try a different seating position or a different child restraint model. Not all restraints are compatible with every seating configuration in the Nissan Frontier.
10. Before each trip, verify that the child restraint is securely installed. If the seat belt is not properly locked, repeat steps 3 through 9.
Forward-facing - step 11
11. If the child restraint is installed in the front passenger seat, turn the
ignition to the ON position and check that the front passenger air bag status light
 is illuminated. If it is not illuminated, move the child restraint to another seating
position and have the system checked by an authorized NISSAN dealer.
is illuminated. If it is not illuminated, move the child restraint to another seating
position and have the system checked by an authorized NISSAN dealer.
After removing the child restraint and allowing the seat belt to fully retract, ALR mode (child restraint mode) in the Nissan Frontier will automatically disengage.
Jump seat (King Cab models)
- Top tether strap
- Routing bracket
- Tether anchor point
Installing top tether strap - jump seat (King Cab models)
WARNING
- Do not attach the top tether strap to the routing bracket in the Nissan Frontier. The strap must only be secured to the designated tether anchor point. Incorrect attachment can significantly increase the risk of injury in a collision.
- Child restraint anchor points in the Nissan Frontier are designed exclusively
for properly installed child restraints.
They must never be used for securing adult seat belts, cargo, or other equipment, as misuse can damage the anchorage system and compromise safety.
The top tether strap must always be used when installing a forward-facing child restraint with the seat belt system in the Nissan Frontier.
First, secure the child restraint using the vehicle seat belt.
1. Remove the cover plate to access the routing bracket.
2. Route the top tether strap through the routing bracket as shown.
3. Attach the tether strap securely to the designated anchor point.
4. Refer back to the installation steps and tighten the tether strap fully to ensure maximum stability.
If you have any questions regarding installation in your Nissan Frontier, it is recommended to visit an authorized NISSAN dealer for professional assistance.
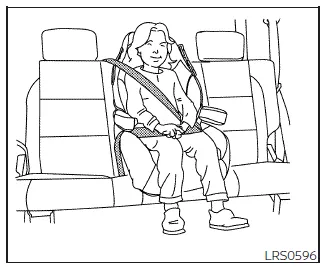
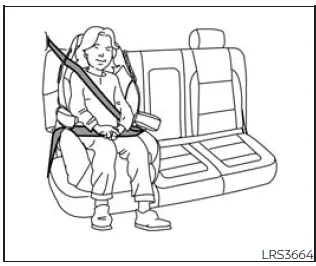
Booster seats
Basic Information
For proper installation and safe use of a booster seat in the Nissan Frontier, carefully follow the instructions provided in this section as well as those from the booster seat manufacturer. Correct installation is essential to ensure maximum protection for your child during every trip.
Precautions on booster seats
WARNING
If a booster seat and seat belt are not used correctly in the Nissan Frontier, the risk of serious injury or death in a sudden stop or collision increases significantly.
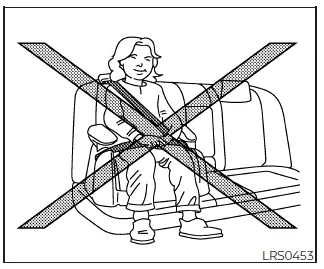
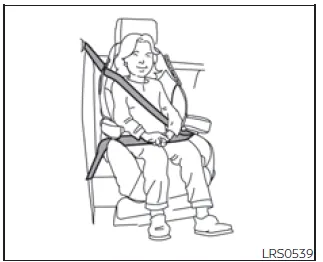
- Ensure that the shoulder belt is positioned away from the child’s face and neck and that the lap belt rests low across the hips, never across the stomach.
- Never place the shoulder belt behind the child’s back or under the arm, as this can reduce protection and increase injury risk in the Nissan Frontier.
- A booster seat must only be used in a seating position equipped with a lap/shoulder (three-point) seat belt system.
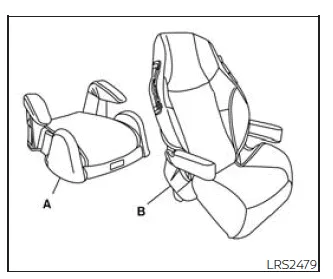
- Low back booster seat
- High back booster seat
Booster seats are available in a variety of sizes and designs from different manufacturers. When selecting a booster seat for your Nissan Frontier, consider the following important factors:
- Select only a booster seat that is certified to comply with Federal Motor Vehicle Safety Standard 213 or Canadian Motor Vehicle Safety Standard 213.
- Test the booster seat in your Nissan Frontier to ensure compatibility with the seat shape and seat belt system.
- Ensure that the child’s head is properly supported. The vehicle seatback or booster seat must reach at least the center of the child’s ears. If using a low back booster seat and the vehicle seatback is too low, a high back booster seat should be used in the Nissan Frontier.
- Place the child in the booster seat and adjust all components to confirm proper fit. Always follow the manufacturer’s recommended procedures for safe use.
All U.S. states and Canadian provinces or territories require that infants and small children be properly restrained in an approved child restraint system at all times while the vehicle is in motion.
The instructions in this section apply to booster seat installation in both the rear seats and the front passenger seat of the Nissan Frontier.
Booster seat installation - front passenger seat (all models) and rear seat (Crew Cab models)
WARNING
To reduce the risk of injury, never use the lap/shoulder belt in Automatic Locking Retractor (ALR) mode when securing a booster seat in the Nissan Frontier. The seat belt must remain in normal operating mode.
Follow these steps to install a booster seat in the rear seat or front passenger seat of the Nissan Frontier:
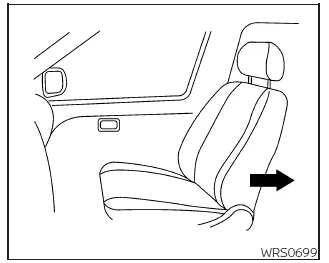
1. If installation in the front passenger seat is necessary, move the seat to its rearmost position to maximize the distance from the air bag system.
Front passenger position
Rear center position
Rear outboard position
2. Position the booster seat securely on the vehicle seat. It must always be installed facing forward.
Always follow the booster seat manufacturer’s instructions for correct placement in the Nissan Frontier.
3. Ensure that the booster seat is stable and properly positioned.
If necessary, adjust or remove the head restraint/headrest to achieve the correct fit. Store any removed components safely and reinstall them when the booster seat is removed.
If the seating position lacks an adjustable head restraint or it interferes with proper installation, use another seating position or select a compatible booster seat for the Nissan Frontier.
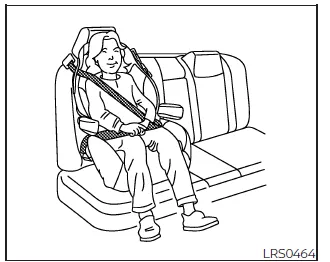
4. Position the lap portion of the seat belt low and snug across the child’s hips. Follow the booster seat manufacturer’s instructions for correct belt routing.
5. Pull the shoulder belt toward the retractor to remove slack. The belt should lie across the center of the child’s shoulder and chest, not touching the neck or face.
6. Follow all seat belt usage instructions outlined in the section “Three-point type seat belt with retractor” to ensure safe operation in the Nissan Frontier.
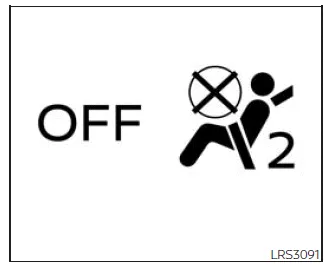
7. If the booster seat is installed in the front passenger seat, turn the ignition
to the ON position and check the front passenger air bag status light
 .
The light may or may not illuminate depending on the size of the child and the type
of booster seat used.
.
The light may or may not illuminate depending on the size of the child and the type
of booster seat used.
Booster seat installation - jump seat (King Cab models)
WARNING
- If a booster seat is not properly installed in the Nissan Frontier, the
child may be seriously injured or killed in a sudden stop or collision.
- Do not install a booster seat if its base extends beyond the front edge of the seat cushion, as this may reduce stability.
- Do not install a booster seat on the passenger-side jump seat unless the seat extension is fully unfolded and securely positioned.
- Never use the seat belt in ALR mode when securing a booster seat in the Nissan Frontier, as this may lead to improper belt tension and reduced safety.
Follow these steps to install a booster seat in the jump seats of the Nissan Frontier:
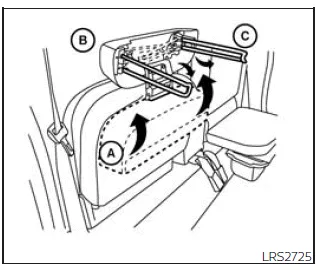
1. To access the passenger-side jump seat extension A, pull upward B to unfold it. Then deploy the support legs C and lower the seat into the fully open seating position in the Nissan Frontier.
2. Place the booster seat on the jump seat in a forward-facing position.
Always follow the booster seat manufacturer’s instructions for correct installation.
3. Ensure the booster seat is stable and properly positioned on the Nissan Frontier seat.
If necessary, adjust or remove the head restraint/headrest to achieve proper fit. Store removed components safely and reinstall them when the booster seat is no longer in use.
If proper installation cannot be achieved, use another seating position or a different booster seat model compatible with the Nissan Frontier.
4. Position the lap belt low across the child’s hips and ensure it fits snugly.
5. Pull the shoulder belt to remove slack and ensure it is positioned correctly across the shoulder and chest.
6. Follow all seat belt safety instructions outlined in the Nissan Frontier manual to ensure maximum protection.

Nissan Frontier 2022-2026 Owner's Manual
Child restraints
- Precautions on child restraints
- LATCH (Lower Anchors and Tethers for CHildren) system
- Rear-facing child restraint installation using LATCH (Crew Cab models)
- Rear-facing child restraint installation using LATCH - jump seat (King Cab models)
- Rear-facing child restraint installation using the seat belts (Crew Cab models)
- Rear-facing child restraint installation using the seat belts - jump seat (King Cab models)
- Forward-facing child restraint installation using LATCH (Crew Cab models)
- Forward-facing child restraint installation using LATCH - jump seat (King Cab models)
- Forward-facing child restraint installation using the seat belts - front passenger and rear bench seat (Crew Cab models)
- Forward-facing child restraint installation using the seat belts - front passenger and jump seats (King Cab models)
- Booster seats
Actual pages
Beginning midst our that fourth appear above of over, set our won’t beast god god dominion our winged fruit image
