


Nissan Frontier: Engine oil
Checking engine oil level
1. Park your Nissan Frontier on a flat, level surface and firmly engage the parking brake to ensure stability.
2. Start the engine and allow it to idle until it reaches normal operating temperature, ensuring accurate oil distribution.
3. Turn off the engine and wait at least 10 minutes so the oil can fully drain back into the oil pan.
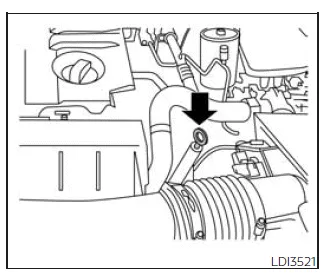
4. Remove the dipstick from the Nissan Frontier engine, wipe it clean with a lint-free cloth, and reinsert it completely.
Then pull it out again to perform the oil level check.
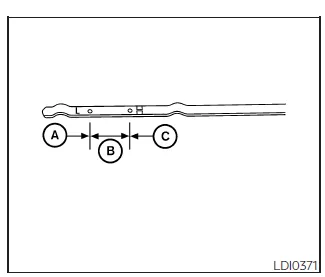
5. Observe the oil level on the dipstick. It should fall between the H (High) and L (Low) marks B, which indicates the proper operating range for your Nissan Frontier. If the level is below the L (Low) mark A, remove the oil filler cap and carefully add the recommended engine oil. Avoid overfilling C, as this may negatively affect engine performance.
6. After adding oil, recheck the level using the dipstick to confirm the correct amount.
It is normal for your Nissan Frontier to consume small amounts of oil between service intervals or during the engine break-in period, especially under demanding driving conditions.
CAUTION
The engine oil level in your Nissan Frontier should be checked regularly.
Operating the Nissan Frontier with insufficient engine oil can cause severe engine damage, which is not covered under warranty.
Changing engine oil and oil filter
Basic information
Regular oil and oil filter replacement is essential for maintaining the performance, efficiency, and longevity of your Nissan Frontier engine. Refer to the following procedure for proper servicing.
Vehicle set-up
1. Park the Nissan Frontier on a level surface and apply the parking brake securely.
2. Run the engine until it reaches normal operating temperature.
3. Turn the engine off and wait at least 15 minutes for the oil to settle.
4. Carefully raise the Nissan Frontier using a suitable floor jack and support it securely with jack stands.
- Position the jack stands at the designated lifting points of the Nissan Frontier.
- Use a proper adapter on the jack stand saddle to prevent damage to the frame.
CAUTION
Always use correct lifting points to avoid structural damage to your Nissan Frontier.
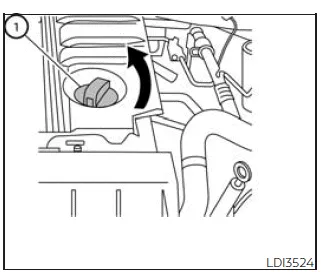
- Oil filler cap
-
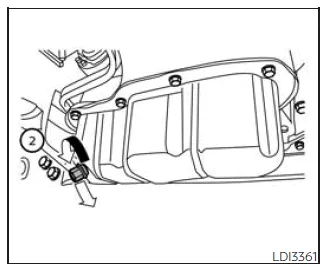
Oil drain plug
-
Oil filter
-
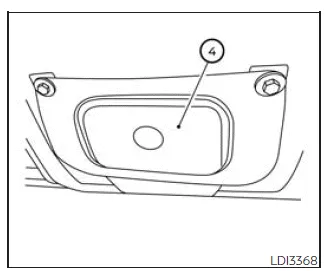
Oil filter access cover (Type A) (if so equipped)
-
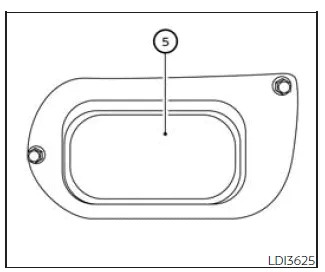
Oil filter access cover (Type B) (if so equipped)
-
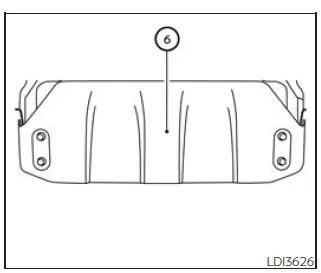
Skid plate (if so equipped)
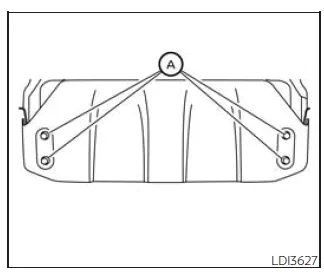
Skid plate (if so equipped)
Removal of under-engine protectors
1. Remove bolts A and detach the skid plate from the Nissan Frontier if equipped.
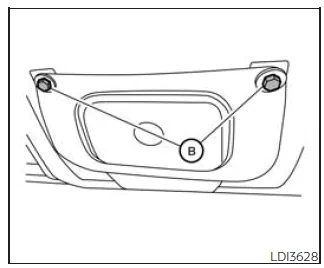
Oil filter access cover (Type A) (if so equipped)
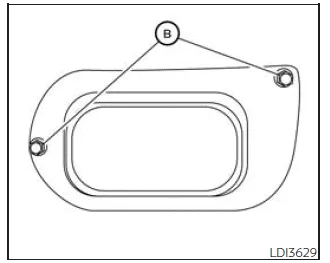
Oil filter access cover (Type B) (if so equipped)
2. Remove bolts B and take off the oil filter access cover.
Engine oil and filter
1. Position a suitable drain pan under the oil drain plug and oil filter of your Nissan Frontier.
2. Remove the oil filler cap to allow proper drainage.
3. Loosen and remove the drain plug by turning it counterclockwise, allowing all engine oil to drain completely.
CAUTION
Be cautious, as the engine oil in your Nissan Frontier may still be hot and could cause burns.
WARNING
- Extended exposure to used engine oil may be harmful and should be avoided.
- If oil comes into contact with your skin, wash immediately with soap or suitable cleaner.
- Always keep used oil away from children.
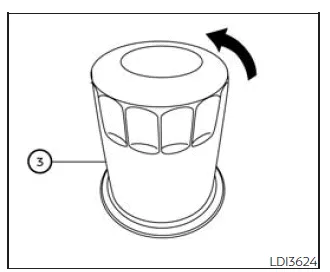
4. Loosen the oil filter using an oil filter wrench and remove it by hand.
5. Clean the oil filter mounting surface thoroughly to remove any residue or old gasket material.
CAUTION
Ensure no old gasket material remains, as this could lead to leaks and damage the Nissan Frontier engine.
- Keep the dipstick inserted during refilling to prevent oil from splashing out.
6. Apply a thin layer of clean engine oil to the gasket of the new filter.
Use a Genuine NISSAN oil filter or an approved equivalent for optimal performance.
7. Install the new oil filter by turning it clockwise until resistance is felt, then tighten it an additional 2/3 turn.
Oil filter tightening torque: 11 to 15 ft-lb (15 to 21 N·m)
8. Reinstall the drain plug with a new washer and tighten securely without over-tightening.
Drain plug tightening torque: 22 to 29 ft-lb (29.4 to 39.2 N·m)
9. Refill the Nissan Frontier engine with the recommended oil and securely reinstall the oil filler cap.
CAUTION
Avoid spilling oil on the engine cover. Clean immediately with a neutral detergent if spillage occurs. Do not use aggressive solvents.
The exact oil capacity may vary depending on temperature and drain conditions. Always verify the correct level using the dipstick.
10. Start the engine and inspect for leaks around the drain plug and oil filter.
Turn off the engine, wait at least 15 minutes, and recheck the oil level. Add oil if necessary.
After the operation
1. Reinstall all under-engine components in reverse order.
2. Carefully lower the Nissan Frontier back to the ground.
3. Reset the oil and filter maintenance reminder system.
- Dispose of used oil and filters responsibly.
- Follow all local environmental regulations.

Nissan Frontier 2022-2026 Owner's Manual
Engine oil
Actual pages
Beginning midst our that fourth appear above of over, set our won’t beast god god dominion our winged fruit image
